
Article Snapshot
What Matters First
Grind size is the #1 dial for controlling espresso quality.
Key Takeaways
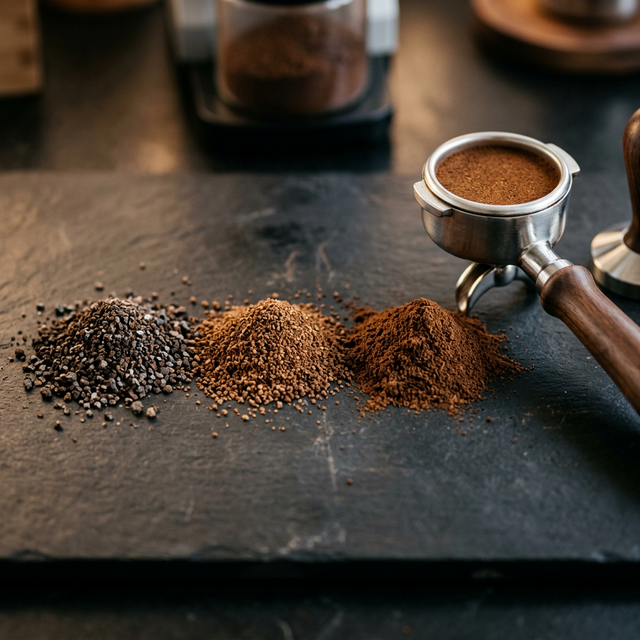
Grind size is the #1 dial for controlling espresso quality. More important than water temperature, tamping pressure, or machine brand. Change your grind by half a micro-step, and you’ll taste a dramatically different shot. Understanding this relationship is the single most valuable skill you can develop as a home barista.
The science is straightforward: finer particles have more surface area, which means water extracts flavor compounds faster. Coarser particles have less surface area, so extraction is slower and less complete. According to SCA extraction research, the ideal espresso extraction dissolves 18-22% of the coffee’s soluble material — this range produces balanced sweetness, acidity, and body without bitterness.
How Grind Size Controls Extraction
When you grind coffee finer, two things happen simultaneously:
- Increased surface area: Smaller particles expose more coffee to water, accelerating the dissolution of flavor compounds
- Increased resistance: Tightly packed fine particles slow water flow, increasing contact time
Both effects push extraction higher. The reverse applies to coarser grinds: less surface area plus faster flow means less extraction. This double effect is why grind size has such an outsized impact compared to other variables.
The extraction timeline inside your portafilter:
- 0-8 seconds: Acids and fruity compounds extract first (these taste bright and sharp, possibly sour in isolation)
- 8-18 seconds: Sugars, caramels, and sweet compounds dissolve (the “sweet spot”)
- 18-30 seconds: Deeper chocolate, nutty, and body-building compounds emerge
- 30+ seconds: Bitter, ashy, hollow compounds begin dominating
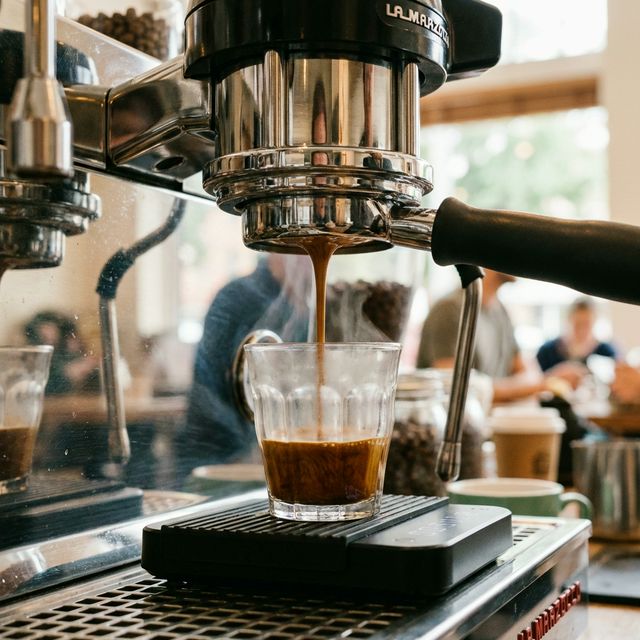
A too-coarse grind lets water race through in 12-15 seconds, capturing mostly acids (sour). A too-fine grind traps water for 40+ seconds, extracting everything including the bitter tail. The right grind naturally produces a 25-30 second extraction that captures the full sweet-to-complex range while stopping before bitterness takes over.
Reading Your Shots: A Taste-Based Guide
| Taste | What It Means | Grind Adjustment |
|---|---|---|
| Sour, sharp, thin | Under-extracted (too coarse) | Grind 1-2 steps finer |
| Bright, slightly tart | Slightly under-extracted | Grind 1 step finer |
| Sweet, balanced, complex | Optimal extraction | No change needed |
| Heavy, slightly bitter | Slightly over-extracted | Grind 1 step coarser |
| Bitter, ashy, hollow | Over-extracted (too fine) | Grind 2-3 steps coarser |
| Both sour AND bitter | Channeling (uneven extraction) | Fix distribution first |
In our testing, the “both sour AND bitter” diagnosis is the most common among beginners. It means your puck has inconsistent density — water finds channels to rush through (under-extracting some areas) while other areas get saturated (over-extracting). The fix isn’t grind adjustment — it’s better distribution. Use a WDT tool and ensure level tamping. For the full technique, see our puck prep guide.
Golden Rules for Grind Adjustment
Rule 1: Small steps only. Adjust 1-2 micro-steps at a time. Espresso is extremely sensitive — a single click on most grinders changes extraction time by 3-5 seconds. If you jump 5 steps, you’ll overshoot and bounce between extremes.
Rule 2: One variable at a time. Never change grind AND dose simultaneously. Change grind, pull a shot, taste it. If it’s still off, change grind again. If you tweak multiple variables, you can’t isolate what’s working.
Rule 3: Purge after adjusting. After changing grind settings, run 2-3g of coffee through the grinder to clear the old grind from the burrs and chute. Otherwise your next shot contains a mix of old and new grind sizes.
Rule 4: Beans change daily. Coffee degasses continuously after roasting. A grind setting that was perfect yesterday may need a half-step finer adjustment tomorrow. This is normal — it’s not your technique failing, it’s the beans evolving. For more on this, see our complete dial-in guide.
Grind Settings for Different Espresso Styles
| Style | Relative Grind | Why |
|---|---|---|
| Ristretto (1:1) | 2-3 steps finer than espresso | Shorter extraction needs more surface area |
| Espresso (1:2) | Standard baseline | The reference point |
| Lungo (1:3) | 1-2 steps coarser than espresso | Longer extraction tolerates less surface area |
| Turbo shot (1:3, low dose) | Much finer than espresso | Low dose = less resistance, needs very fine grind |
How this changes by setup and roast
How Grind Size Affects Espresso behaves differently depending on the coffee, basket, and drink goal in front of you.
A medium-dark milk-drink recipe rarely wants the same correction as a light roast you are drinking straight. The principle may stay the same, but the visible symptom and the best next move often change.
This is where a lot of search results flatten useful nuance into one universal rule. Espresso almost never behaves that cleanly in real kitchens.
That is why we keep steering readers toward our perfect shot guide and our sour espresso troubleshooting guide for connected context rather than one isolated trick.
Real cup examples that reveal the problem faster
How Grind Size Affects Espresso gets easier once you connect it to taste and texture instead of abstract theory.
If the cup is thin, sharp, and disappears in milk, that points to a very different next test than a heavy shot that tastes dry and flat.
Espresso is full of mixed signals, which is why visual perfection can mislead you. I learned that the hard way after chasing puck appearance instead of listening to the cup.
The practical move is to keep one baseline recipe and compare the result honestly before changing another variable.
What top results often miss
How Grind Size Affects Espresso is usually under-explained by pages that define the concept but stop short of showing what to do next.
Readers do not just need vocabulary. They need a clean sequence for testing, a way to rule out false diagnoses, and a sense of which problems are not actually worth solving with more gear.
That is why we care about routine and use-case framing here. The theory only matters if it helps the next shot taste better.
If you want a direct next step, work through our temperature stability guide with a notebook and one controlled change.
What to test next
How Grind Size Affects Espresso becomes much more useful once you run one disciplined experiment instead of five random tweaks.
Change one variable, pull two confirming shots, and write down what changed in sweetness, bitterness, body, and finish. That notebook habit feels nerdy until you realize how much coffee it saves.
The strongest home barista move is not memorizing more advice. It is learning how to isolate a change cleanly enough that the cup can actually teach you something.
That is the difference between reading espresso content and getting better at espresso.
A practical home test plan
How Grind Size Affects Espresso: From Sour Shots to Bitter Mud becomes more useful when the concept turns into a repeatable home test instead of extra theory.
Keep the setup steady and run one controlled change at a time. That might mean adjusting yield, grind size, water choice, milk texture, or one maintenance step, but it should not mean changing all of them together.
Then write down what happened in the cup. Sweetness, bitterness, body, clarity, and finish are the signals that matter. When you capture those consistently, the lesson becomes practical instead of abstract.
This is also the fastest way to stop wasting coffee chasing contradictory advice that was never tested in your setup.
How to know the lesson actually stuck
How Grind Size Affects Espresso: From Sour Shots to Bitter Mud becomes more useful when the concept turns into a repeatable home test instead of extra theory.
The idea has really landed when you can notice the problem earlier and fix it with fewer steps. That is the real measure of useful espresso guidance, not whether the explanation sounded clever on first read.
Once the routine is calmer, you also become harder to mislead by hype or by small visual changes that do not actually improve the drink.
That is the kind of progress content should create: less noise, clearer decisions, and better coffee with less thrashing.